Monday, November 24, 2008

Cauliflower Gratin

This is part 2 of about 4 in my attempt to catch up writing about the dishes I've made. Trusty iPhoto says I downloaded the pictures in this post from the camera on October 5th. This dish was inspired by a mediocre-sized head of cauliflower we received in our CSA. You can see it below, hidden slightly behind the horseradish. Notice that it's not nearly as pretty looking as the store-bought head next to it, but hey, it also didn't travel 5,000 miles to get to my cutting board. It's probably a good thing we got it in the CSA. If we hadn't, this dish was in jeopardy of never getting made. See, cauliflower just doesn't do it for me. I'm not sure why, I just don't really like it. I think it smells weird, tastes weird, and feels funny. All that said, I promised to myself I'd keep an open mind throughout all of this.


The other ingredients in the picture are, kind of from left to right: butter, cream, parsley, nutmeg, bay leaf, vinegar, panko, curry powder, horseradish, Emmentaler cheese, and shallot.

The first step was to prepare the cauliflower. I did this by removing the leaves and cutting away the florets. The cores were set aside for use in this dish, and the florets were chopped into smallish pieces:


There is kind of an odd skin on the core, so I peeled that off and chopped the remaining core before placing it in the food processor:


I let the processor run for a solid minute to puree the core, only to find myself a little short of the required 1 cup. In went a few florets, and a few seconds later I was all set:


That's the end of the prep work associated with this dish. From this point on, it's pretty straightforward. I blanched the florets in a pot of water, salt, and vinegar (the vinegar keeps the florets white).

I added butter and shallot to a saucepan and let that cook for a minute or two to soften the shallot up:


I added to that some seasonings, the bay leaf, thyme and parsley. I added to that the cauliflower puree, and to that I added a little under a cup of water. That all turned into a milky white sauce that didn't really smell that good:


After that had cooked down a little bit, I added the cream and simmered the mixture for two minutes. I took the sauce off the heat and fished out all of the items that don't belong in a sauce.


The sauce made its way over to the blender and received a few gratings of curry powder. It looks kind of like egg nog, but trust me, it's not:


Once the mixture had cooled a little bit, I added the horseradish and blended everything until it was smooth as silk. Not really. I gave it about fifteen seconds and called it good. I tossed this sauce with the florets and seasoned the whole things with more salt, pepper, and some fresh nutmeg.

It all fit nicely into a medium-sized casserole dish, which I placed in the fridge for about an hour to let the flavors meld. This is a critical step, lest the cauliflower-flavored cauliflower puree not blend well with the cauliflower-flavored cauliflower florets.


While that was chilling in the fridge, I heated the oven to 450 degrees. I took the dish out, sprinkled it with the cheese and panko, and put that sucker in the oven for about 25 minutes. The tops were looking deliciously browned, so I broiled it for a minute or two as well. Out came this:


The lighting in these last two pictures doesn't really do the dish justice. It looked great. There was bubbling cheese, browned cauliflower florets, everything you would expect.


Unfortunately for me, the list of things I expected did not include great taste. I make absolutely no claims that this was the recipes fault. In fact, in an unofficial survey, 100% of the other taster's that enjoy cauliflower though the dish was really good. It's just not for me I guess. I'll eat broccoli, Brussels sprouts, beets, but you can keep the cauliflower.

Monday, November 17, 2008

Sweet Crepes with Peaches and Pastry Cream

You may find it odd that I'm making dishes using peaches in the middle of November in Colorado, but I've just been incredibly delinquent in the writing of these posts. I actually made this dish a couple of months ago. It's a little more simple to do than it appears. I was all prepped for a crepe-tastrophy, but it wasn't meant to be.

The first task was to make the crepes. The ingredients are very simple: flour, salt, sugar, eggs, and milk. Some vanilla and butter add an extra kick.


I combined the flour, salt, and sugar in one bowl, and the eggs, milk, and vanilla in another. This looks exactly how you think it should look:


Next up was 'vigorously whisking' of half the wet mixture into the dry mixture until that was smooth. In went the rest of the wet mixture and I let the batter rest for about an hour. The guidelines here are anywhere from 30 minutes to a day.


After it's rest period I strained the batter through a fine mesh strainer to ensure there was no junk in there:


I added the melted butter to the bowl, and presto, the batter was ready. The next instruction was to 'Preheat a 12-inch crepe machine...' Uh, hmmm, I don't have one of those. '...or a large crepe pan...' Uh, hmmm, I don't have one of those either. '...or a 10-12 inch nonstick skillet.' Finally. Bring in the third string. I heated my trusty non-stick skillet over low heat, because the book says rookies should use low heat. Seriously. The more experienced crowd is allowed to work at a higher temperature. I sprayed the pan with non-stick spray because of some sort of accident-prone paranoia, so no sticking was to be had on this night.

I ladled the batter into the skillet in 1/2 cup increments and tilted the pan to spread it out. I turned the heat up to medium and cooked the crepe for a minute or so until it was lightly browned.


The next step was potential for disaster #2: flipping. This task was even tougher than it needed to be because of my third-string kitchenware, which had straight sides that were seeming 12" tall. The first one wasn't too pretty and a little under-cooked, but it's the only one I took pictures of in the cooking process:


I browned the crepe on the other side, and repeated this process for about half an hour. The yield was around a dozen crepes, which is quite a lot for two people to eat.

As for the assembly, that's a snap. I sliced the peaches into thin wedges and took the pastry cream out of the fridge. Oh wait, that's supposed to be at room temperature? Hmmm. Oh well, maybe next time. (Side note: When the next time came around, I did it correctly. I couldn't tell the difference. )

I reheated the skillet over medium heat and added a crepe. As that was reheating, I spread out a bunch of peach wedges across half of the crepe and sprinkled them with a teaspoon or so of sugar:


I added a couple of globs of pastry cream to the peach mixtures, thus completing the filling:


For the final assembly, I folded the crepe in half. And then in half again. I was positive the last fold was going to tear the crepe, but it didn't:


And that's that. I dusted each crepe with confectioner's sugar before serving on the most colorful plate I could find:


We each took a crepe and put it on a somewhat less fancy dish before quickly devouring it. I did manage to sneak this picture in:


These were really, really good. The pastry cream melted to add the perfect texture and some sweetness. The peaches were surprisingly good for the end of the season, and the crepes were a perfect little envelope. We made this again the next night, and then started messing around with the fillings after that. It's relatively easy once you have the pastry cream made and all the ingredients together, certainly something you could pull off in an hour. This goes in the keeper pile, probably just waiting for the perfect fruit filling to come along next summer.

Monday, October 27, 2008

Pastry Cream

Welcome back to me. I haven't posted anything in a few weeks, even though I have made a few dishes. That's mostly due to the fact that we bought a condo, which keeps you mind-bogglingly busy. The peak of that seems to have passed, so hopefully I can get caught up in the next couple of weeks.

Pastry cream is just one of the ingredients in Sweet Crepes with Peaches and Pastry Cream, but it requires some preparation that is detailed in the recipe for a strawberry tart. . That fact earns the pastry cream its own post.

It's a pretty simple concoction, consisting of only milk, sugar, vanilla bean, cornstarch, butter, Grand Marnier, and eggs. Take out just a couple of things and you essentially have an ice cream base. It's neat to see how similar recipes yield completely different foods.


I started out by combining some of the milk, some of the sugar, and the vanilla bean into a saucepan and bringing it all to a simmer.


While the milk mixture was coming to a simmer, I combined the rest of the milk and the cornstarch in a small bowl.


Now that the cornstarch was sitting around getting happy, I whisked the eggs and remaining sugar in a bowl, resulting in this anti-climatic mixture:


Even more anti-climatic-ly, I mixed the cornstarch mixture into the egg mixture, which I'm sure you can guess looked exactly like an egg mixture mixed with a milk mixture:


The milk had come to a simmer, so I tempered the egg mixture by pouring a bit of the hot milk mixture into the egg mixture. When I was convinced the egg mixture was sufficiently warm to avoid turning it all into scrambled eggs, I dumped the egg mixture into the saucepan of simmering milk:


I cooked the mixture over medium heat. Under caution from the book, I continuously stirred it waiting for the mixture to thicken and become "lumpy". It started to thicken at about the same time that my arm was beginning to get tired:

My arm was numb around the time it started to become lumpy. It was like stirring some well-set cement:


That was it for the cooking portion. I took the cream off the heat and continue to whisk the crap out of it to remove all of the remaining lumps. After it had been off the heat for a couple of minutes, I added in the butter and Grand Marnier. Immediately after that I spread the cream out into a baking dish and covered it with plastic wrap. As far as I can tell, this is to avoid the formation of a skin on the top of cream. We all know the skin that forms on some foods when left out too long, and it's gross, so I had no intentions of dealing with it here:


Now that the cream was wrapped about four times tighter than it needed to be, it went into the refrigerator. I would use the cream in the crepe recipe the next night.

Without spilling the beans on the crepe recipe, I'll just say that the cream had pretty great flavor. The texture wasn't my favorite however. It wasn't really creamy, but more like a gel. It did something that resembled melting in the crepe, which helped, but it was still just an odd texture for me. It was the perfect complement taste-wise, balancing the lightness of the crepe and the peaches, and I don't think the crepes would of been the same without the cream.

Sunday, October 5, 2008

Brioche

I was supposed to make brioche for the Croque Madame I made long ago, but I was too lazy then. Instead, I linked to The French Laundry at Home and used some store bought bread. I finally got around to making the brioche about a month ago, and now I'm finally getting around to writing about it. Finally.

We'll just jump right in here with the ingredients. You'll see it's pretty tough to mess something up with ingredients like this:


It's a pretty simple list, in absolutely astounding proportions. There's eggs, cake flour, AP flour, sugar, salt, yeast and butter. That would be about five sticks of butter. For two loaves of bread. For comparisons sake, one of the loaves was about the size of a pound of butter. That means that the bread was about half butter. Seriously.

I started by blooming the yeast in some warm water. After a few minutes it looked absolutely gross:


And after ten minutes plus a good stirring it looked a little like a melted Starbucks Frappucino:


During those ten minutes, I sifted together close to equal amounts of cake and all-purpose flour, as well as the sugar and salt. That all went into the bowl of my mixer along with six eggs. I beat it with the dough hook for about a minute:


In went the yeast mixture, followed by another five minute pummeling of the dough:


Now it was time for all of the butter. As you can see in the picture above, I had cut it into slices that were a little less than a tablespoon each. I added about a quarter of the butter at a time, allowing all of the butter to be incorporated before moving on to the next batch. After all of the butter was mixed in, I allowed the mixer to have its way with the dough for ten more minutes. What came out after those ten minutes was pretty disgusting. It was kind of a slimy, greasy mess:


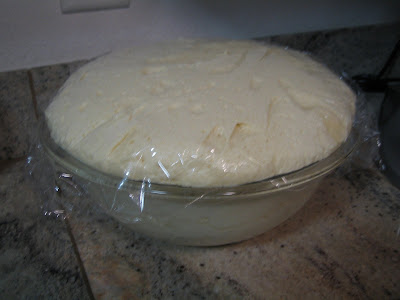
I lightly floured a glass bowl and dumped the dough in. After covering it with plastic wrap it took a little trip to a warm place (a corner of kitchen counter) for a three hour nap:


The dough woke from its little nap having put on a little weight:


I took care of of that problem by removing all of the excess air:


I was surprised at this point that the dough was still so runny and moist, for some reason I had expected it to dry out a little bit. I'm not sure why I thought that, but I did. The dough took another trip, this time to the refrigerator for a night's long rest.

I buttered a couple of bread pans in preparation for baking the bread. You know, just in case there wasn't enough butter in the dough to prevent sticking:


Out came the dough, which had grown yet again, although not quite as much as it had the first time.


It had, however, turned more into what I had expected consistency-wise. It was a little less slimy and a little more firm. I divided the dough into equal pieces and formed them into loaf shapes in each pan:


Then I left the house, again, so they could rise for three more hours. The recipe said to wait until the dough rose 1/2" above the top of the pan, or about three hours. After about four hours, it still hadn't even come close to the top of the pan, and it appeared as if all growth had stopped:

Now if you're keeping track at home, that's about 21 hours of resting. I got impatient, and decided that was plenty. I put both loaves into the oven, which I had pre-heated to 350 degrees. The recipe said it would bake for 35 to 40 minutes, or until the pan sounded hollow when tapped on the bottom. I gave it a little knock at about the 30 minute mark because the bread looked and smelled like it was about done. It sounded ridiculously hollow for something that was not, in fact, hollow at all. I took these out of the oven:

The next step depends on your intention for the bread. For immediate consumption, you are to let it cool for ten minutes and then slice. If you plan to eat it within a few hours, wrap the bread in foil and set it aside. For anything longer than that, wrap the hot bread in foil and freeze it immediately.

The smell at this point was pretty incredible, so there was no way both of the loaves were going to survive the day. One got set aside to be sliced in the very near future, the other wrapped up in two layers of foil and then put in a plastic bag for freezing. That process took just long enough that I could justify cutting into the bread as soon as I was done.

The bread was delicious, some of the best that I've ever had. It tasted almost like a croissant, which shouldn't be too surprising given the ingredients. The texture was great, and it stayed that way for several days. It was great plain, with some jelly, toasted, toasted with some butter, toasted with some jelly, and drizzled with chocolate for dessert. I'm sure it would have been great other ways, but I ran out after the chocolate part.

This was my first attempt at making bread from scratch, and I have to say I was pretty impressed. Aside from the absurd amount of downtime, it's pretty easy to make. There are a couple of other recipes in the book that make use of it, so I'll get to make it then at a minimum, but I hope to be able to make it a little more often than that. I guess it just depends on how much time I have available to exercise...

Monday, September 15, 2008

Glazed Vegetables

The decision to make this dish was based entirely on the plethora of root vegetables that we've been receiving from our CSA. We're getting nearly ten pounds a week, and eating it all is more than challenging. We've had root vegetables in just about every possible way you can imagine. First it was beets, then potatoes, turnips and carrots.

The glazed vegetable section is a little unique to the book. There is a recipe for just 'Glazed Vegetables' which can be used for any type of vegetable you would ever want to glaze. Following that, there are individual recipes for single vegetables that cater a little more to that particular vegetable by adjusting herbs and spices and that kind of thing.

I chose the generic recipe because of my selection of vegetables. You can see below that I had orange and red carrots, turnips, and pearl onions. How disappointing is it that red carrots are orange under the skin and not red like we're all led to believe? My disappointment would not come without a consolation prize though. It turns out each vegetable has to be cooked in its own pot to avoid bleeding of colors, so I was able to put both of the carrots types into a single pot. Hooray nature! Here's the starting material:


These are not your grocery store vegetables that have been bred to look nice and uniform. These are all very different in shape and size and covered in dirt. Imagine that, dirt on your food. Anyway, this makes cooking with them a touch harder since it's a little more difficult to carve equal sized pieces.

The first step was to peel and carve all of the vegetables. It was a lot of peeling, turning my sink into a vegetable wasteland.


Keller gives a couple of options for carving the vegetables into edible sized pieces. These include small balls and "turning" them. When you turn them, or tourner for you Frenchies, you end up with a seven sided football kind of thing. I tried this a couple of times and decided it wasn't for me. What was for me was this: I started by cutting the carrots and turnips into boxes about 2"x.5"x.5". I quickly turned the four sided shape into an extruded octagon by chopping off each of the four corners of the box. It's pretty hard to write about, but very easy to actually do. By no means is it as cool as turning, but it's a lot more achievable, especially if you don't have three hours to sit around and carve shapes out of vegetables. One thing about all this carving is that is creates a lot of waste, which isn't great at all, but I'm sure you can find a use for random small pieces of turnips if you really want to.

As I mentioned earlier, each vegetable is cooked separately at the beginning to avoid the bleeding of colors. You can see here that I had the vegetables and a set of seasonings for each. These included a bay leaf, some peppercorns, and some fresh thyme.


I put each vegetable in a saucepan and just covered them with cold water. I added some butter, sugar, and the seasonings along with some salt to each pot.


I brought the water to a boil, reduced the heat and let it simmer for about half an hour. The book said ten minutes, but I'm now used to the fact that the books times are nearly always shorter than what it ends up taking for me to complete each step.

Because it took the liquid took so long to reduce I took the vegetables out of when they were tender. After the liquid had finished doing its thing and turned into a glaze, the veggies went back into their respective pots. I again seasoned them with a bit of salt.


Some vigorous shaking of the pots ensured equal coverage of all pieces. At this point everything was removed from the heat and put in a bowl to wait for dinner time a couple of hours later.

To prep everything for serving, all of the vegetables went into a single saucepan to be reheated. After I tasted a carrot for seasoning, they got transferred to individual serving plates and garnished with some fresh chives.


Now these are probably some of the coolest pictures I've taken so far, so here's another one:


Not only did the pictures turn out well, so did the vegetables. They were cooked very well, tender throughout but not mushy by any means. The glaze was sweet, but not too sweet. The herbs added a layer of complexity beyond just the veggies and glaze. It's something I'd make again given an abundance of root vegetables, or possibly as a side dish at a big meal. They were gone by the end of dinner, so they must of been well received, right?