Tuesday, July 29, 2008

Chilled Salad of Haricots Verts and Tomatoes

This dish was a small part of what was undoubtedly the best eating week of my life. It occurred on my honeymoon last October and included meals at The French Laundry, Bouchon, and several other Napa and Sonoma area restaurants. My wife ordered it as an appetizer and it every bit was worth it. All that said, it's not the reason I chose to make this dish. I'm wayyyyy to practical for that kind of reasoning. The last post on basil puree goes into the real reason behind making this dish (I had a lot of basil), so I'll skip that part here. Or did I just tell you? Go read the basil post anyway.

By no means have I made a large percentage of the Bouchon recipes yet, but patterns are certainly emerging. One of them is the use of vinaigrette with vegetables. Another is the pairing of hard-boiled eggs and vegetables. Another is the use of a lot of fresh herbs. Just check out the asparagus post if you don't believe me. All of these were in play for this salad.

The ingredients list for this salad is pretty long, especially for something in which he description starts off with 'This is a pretty straightforward salad..." Here's the full list: haricots verts, red onion, fennel, salt and pepper, Pernod, olive oil, tomatoes, eggs, olives, anchovy, basil puree, vinaigrette, shallots, chives, tarragon, chervil, and parsley. I cut a few corners and ended up with what you see below:

That would be fennel, hard-boiled eggs, heirloom tomatoes, red onion, and green beans for the 'meat' of the salad. Add to that the vinaigrette, basil puree, shallots, parsley, and chives for the dressing.
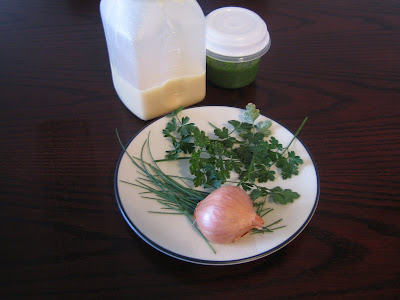
That means that I left out five ingredients. Try and figure it out? Get it? No? You didn't try? Fine. I left out the Pernod (hate the taste), olives (hate the taste), anchovy (totally forgot them at the store), tarragon and chervil (too cheap). Now that we have that all ironed out, let's do a little cooking and a bunch of assembling.

The first step was to blanch the green beans. I boiled a large pot of water and dumped a bunch of salt into it, because "it should taste like the sea" according to Sir Keller. In went the green beans for about four or five minutes, after which I drained them and transferred them to an ice bath. After another draining I laid them out onto paper towels to dry them further. Finally convinced that they were dry, I put them into the fridge to chill for awhile.

Next up was the chopping of the red onion into thin slices. I made sure that all of the pieces were cleanly separated and put those into the refrigerator as well. The fennel required a tad bit more careful dissection, and I wish I had taken some pictures of it because it was the first time I'd ever cooked with fennel. Gotta save the memories forever! I almost left it out for the same reasons I left out the Pernod, but it really wasn't too strong of a flavor in the final dish so I'm glad I didn't. Anyway, I cut the bulb of the fennel in half and removed what was obviously an inedible core and then sliced it into slices just like the onion. I tossed the fennel with some salt and olive oil (this is where the Pernod would of come in) and that joined the beans and the onion in the fridge.

Last up for a trip to the refrigerator were the tomatoes. I purchased two nice looking heirloom tomatoes, one red and one yellow, and sliced them fairly thinly. They got sprinkled with some salt and pepper and drizzled with olive oil. Guess what's next? That's right, into the fridge they went.

Ok, now it's time to end this lack of pictures and start assembling the salad. The bottom layer of the salad was the tomatoes. They're not the prettiest slices you've ever seen, but I promise you that they taste exactly the same as even the most perfect slices you've ever laid your eyes on. I seasoned them with a bit more salt and pepper.


Meanwhile, I tossed all of the dressing ingredients that I was using with the beans until they were well coated and then mixed that with the onion and fennel. All of that got mounded on top of the tomatoes. I'm using mounded loosely here, since it pretty much just collapsed into a single layer.


The final garnish was to add hard-boiled egg quarters. This is where the anchovy and olives would have come in as well, but I skipped that part.


And there you have it. It was very good and highlighted the concepts that Bouchon does best. That is, it lets the fresh vegetables speak for themselves but still adds additional flavor through the dressing and extra texture with the eggs. All that being said, you could take this salad down just a notch and have something that would be 95% as good and take 30% of the time. I would consider trading the basil puree for a little fresh basil next time, and also probably leave out the fennel. Those two changes alone would make the dish extraordinarily easy, quick, cheap, and still extremely good. I'm learning quickly that it's really kind of hard to mess up fresh, in season vegetables. This one is a keeper.

Saturday, July 26, 2008

Basil Puree

This basil puree was destined for use in a salad of tomatoes and haricots vert (beans that are green for the non-French). The ingredients are essentially the same as a basil pesto minus any pine nuts or cheese. I chose to make the aforementioned salad mostly because it included the basil puree. Why the desire to make basil puree you might ask? That would be because our basil plant is growing out of control and I needed to find something to use it for.


As I was saying, the ingredients are pretty straightforward; basil, garlic, olive oil, and salt. Take a note of the relative size of the bunch of basil leaves here compared to the garlic. There are a lot of leaves here, or so I thought. It turns out the recipe calls for about 10 times that many leaves. My plant was growing fast, but not nearly that fast. I scaled the recipe down significantly with only minor side effects. Continuing on...

The first step was to blanch the basil leaves in boiling water. This took exactly five seconds. Really. Five seconds isn't all that long, so there are no pictures of it. You'll just have to imagine the sight of a boiling pot of water with some basil leaves in it. I drained the leaves after the five seconds were up and plunged them immediately into an ice bath to stop any cooking as well as to set the color. I drained them again after all of the leaves were nice and cooled off, and dried the leaves off on paper towels for a few minutes.


After that I squeezed the remaining water out of the leaves. Can you tell they are supposed to be dry before continuing? Now that the leaves were totally dry, I chopped them up a bit to help with the blending process.


Here's your first chance to see the effects of basil shrinkage. The original leaves were about 30 times the size of the garlic, and now it's down to 5 or 6 times as big. I add the basil leaves, garlic, salt, and a little bit of oil into the blender and started trying to puree the mixture.

This is where I felt the effects of reducing the recipe by so much. There just wasn't enough oil in the blender to allow the basil leaves to puree, so I was forced to add more oil than I wanted to. The result was a slightly strong olive oil flavor in the finished puree, but hey, what are you going to do if you don't have access to a basil forest?

I eventually got everything pureed all together. I wish I had taken a picture of the garlic next to the finished puree, because we are talking about obscenely small quantities here.

That little container holds a 1/2 cup when it's full. I figured it was about 1/3 full, meaning there was about 1.3 oz at the end. It was probably about the same size as the garlic bulb in the other pictures. That is some concentrated basil goodness.

As for the flavor, it was good and very simple. When your only ingredients are basil, garlic, olive oil, and salt, that's probably what your puree is going to taste like. It worked very well in the salad (coming up soon!), so I was happy. I'll consider making it again the next time I stumble across a cubic yard of basil leaves.

Monday, July 21, 2008

Tartine of Pork with Celeriac Remoulade

This sandwich was the culmination of the last several posts. Well, as culminating as leftover pork can be. I originally stumbled upon this dish while planning the next set of recipes to cook a couple of weeks ago. From there I worked backwards through everything I needed for it. This consisted of the last four posts; brine, rack of pork, aioli, and celeriac remoulade. What does this all boil down to? About two weeks of cooking for a sandwich. Was it worth it? Well, two weeks is a long time, but the sandwich was very good.

Once all of those other things were made, the assembly of the sandwich was simple. The ingredients (below) include the leftover pork, baguette, an apple, aioli, watercress, some chives, and the celeriac remoulade.

First up was preparing the baguette. This is an open face sandwich, so I just cut one slice per serving. I had to slice the bread on an impossibly severe bias to get it anywhere near the 10" long that the book recommends, but it turned out ok. I brushed each piece on both sides with some olive oil and then sprinkled on a bit of salt. Under the broiler they went for about a minute per side until they were just lightly toasted.


The rest of the sandwich was an exercise in layering. First up was a layer of the aioli. The aioli was really strong, so I kept the total amount down. It turned out to be about perfect, with just a hint of garlic flavor and the creamy goodness of homemade mayo.


Next up was a layer of watercress. The watercress didn't add a ton to the final sandwich in terms of flavor, but it served as a contrast in texture and color.


The watercress was followed by the pork. I somehow managed to take a delicious looking one of these:


And turn it into something that looked a little like I had just unwrapped it from a plastic container. It may have looked a touch weird, but it fit on the sandwich well and it tasted exactly the same as it did in its whole form. Leave me alone.


Three steps to go. First up was a layer of apples. I thought that the apples were the single best complimenting part of the sandwich. It's a combination that I could eat pretty much all day long, every day. This particular apple was of the grandmother variety, I think her name was Ms. Smith or something like that.


After that, a bit of celeriac remoulade. You may think I was a bit stingy after looking at the picture below, and that's because I was. If you read the celeriac post, you'd remember that I really didn't like it all that much. But since we abide by rules around here and the recipe called for more celeriac, I used celeriac. To be fair, it fit a little better as a piece of a bigger dish than it did on its own.


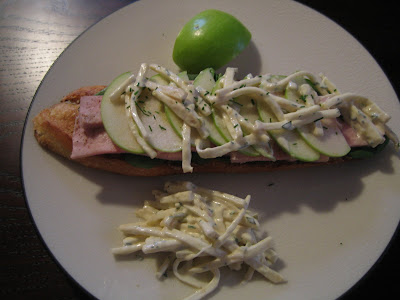
One last step was a sprinkling of chives. I put everything on a white plate with some white celeriac in an attempt to make the most boring looking plate ever. I almost succeeded if not for the piece of apple tucked in next to each sandwich. This dish certainly isn't going to win any beauty awards.


The side of celeriac remoulade still sucked, but the sandwich was great. It had pretty much every imaginable texture, and it all went together perfectly. I think I would adapt this some for everyday use It could easily be just the bread (with oil and salt), mayo, some sort of lettuce, pork, and apple. It would take all of two minutes to throw together. And that would be two minutes quite well spent.

Wednesday, July 16, 2008

Celeriac Remoulade

Celeriac is a new ingredient for me. I kind of assumed (correctly) from the name that is was related to celery, and the book's description quickly confirmed that to be the case. Celeriac, also known as celery root, is from the same family as the celery we all know and love. Celeriac is grown exclusively for the root, which can get quite large in size. According to Wikipedia celeriac is wayyyy less starchy than the other root vegetables. And we know Wikipedia is always correct, so I believe it.

For all intents and purposes remoulade is just a flavored mayo. Because of that, and added to the fact that I don't really like celery all that much, this dish didn't have have too bright of a future in my book. But we're here to learn about new foods and techniques, so I'll try and keep an open mind.

Just a quick side note, I have a friend that hates the flavor of celery. In fact, I'm probably in trouble for indirectly referring to him and celery in the same sentence. So Rob, this is for you.
Everyone else hold on one second....Ok, cool, the door is locked.

The ingredients for the remoulade are mayo, mustard, creme fraiche, vinegar, cornichons, pepper, and herbs.


I started the remoulade by mixing the mayo and creme fraiche together. After mincing the cornichons and squeezing every last drop of water out of them, they joined the mayo and creme fraiche. I added the rest of the ingredients, seasoned it with salt and pepper, and put it in the fridge for a few hours to allow the flavors to develop.


Up next was preparing the celeriac and mixing the two parts together. You would think that chopping some celeriac would be a fairly small feat, and you would be wrong. I started by chopping off the ends.

Celeriac has to have the toughest skin of anything I've ever seen. I was pretty sure that my peeler was going to just split in half and chop my hand off while I tried to peel it. I finally managed to get it all off, but it wasn't a pretty site. Maybe that was someone's way of saying, "Hey, this really ain't for eating."


What you can't see here is the disaster I created on the floor below the board. Oh well. Consider it my exercise for the day. Now that the pain of a skin was gone, it was time to cut the celeriac into 1/8" julienne. This was not nearly as tough as peeling the celeriac, but my knife skills aren't anything that would scare a Philly mugger away. That's a fact.


Once I had that all chopped up, I added just enough of the remoulade to coat the celeriac and put it into the fridge overnight after giving it a taste. It turns out that my low hopes were not unjustified. Hopefully those flavors continued to develop. Into something totally different, kind of like the whole catepillar/butterfly thing.


The next day I took it out of the fridge, added some more remoulade, and served the celeriac remoulade along with the roast pork from a previous post. It was probably ok if you like a heavy mayo taste along with the flavor of celery. Unfortunately, I don't.


It was nothing that I'd make again, that's for sure. It wasn't terrible by any means, they're just flavors that I don't really like. I also had to use this for another recipe, and it was actually a pretty nice complement to that. Oh well, you learn something new everyday.

Sunday, July 13, 2008

Aioli

The giant roast rack of pork that I made provided us with more than enough leftovers. Conveniently, there is a recipe in the book that makes use of the leftovers. What is it, you might ask? Well you'll just have to wait a little while longer for that post. For now you'll just have to live with knowing that I needed some aioli for it.

Aioli is really just garlic flavored mayonnaise, and the ingredients are pretty simple. There is olive oil, salt, an egg, and garlic confit.

I started by completely obliterating the garlic by mixing in the salt and then smashing it repeatedly. And smashing it. And smashing it. It looked kind of gross at the end, but it smelled great.

I put the egg in a large bowl and then whisked in the garlic paste. There was an option to use an immersion blender for the whisking, but alas, I could not seem to find my immersion blender. Or I don't have one. Damn. About ten minutes later I would really want one though, does that count?


At this point the process involved just whisking constantly while slowly adding in the oil.

The aioli gradually grew in volume and thickened in texture.

Finally it was done. I let my arm recover for a few minutes while I contemplated what I had just made. It didn't look that good, somewhere between yellow cake batter and smashed bananas. It smelled like garlic, a lot. It tasted quite good though, mostly like garlic and a little like mayo.

I needed about two tablespoons of the stuff for my recipe, but now I have seemingly three gallons of it in my fridge. Anyone need some aioli, I'm certainly not going to use it all. At least not without suffering from a giant heart attack.

Wednesday, July 9, 2008

Brined Roasted Rack of Pork

I decided to do this rack of pork since it's been while since I pulled off anything that could be considered a main course. Why the rack of pork and not any of the million other main courses in the book you might ask? Mostly because I'm very lacking in the stock department right now and nearly every other recipe requires some kind of stock or sauce. That's what we call, in the business, foreshadowing so keep your eyes peeled.

The first step was to brine the pork. That's not quite true. The first step was to go and buy it. This was, aside from possibly turkey at Thanksgiving, the largest piece of meat that I've ever purchased. The nice people at Whole Foods were kind enough to cut me a piece almost exactly the size that I needed, which just happened to be four and a half pounds.

There it is in all its lazy, flopped over glory. After the pork had been brined for a day, rinsed off and patted dry, I cut a shallow crosshatch pattern into the fat on the topside of the roast. This helps the rendering of the fat as well as makes it a bit easier for the meat to absorb some of its accompanying flavors.

Next up was to tie the roast to force it into a uniform shape that would allow for consistent cooking throughout the entire piece of meat. The Keller method involves using a needle threaded with kitchen twine, which I did not have. I made do, somewhat successfully, by just tying the twine around the entire roast and pulling it fairly tight. It forced the meat into more of a round shape. It wasn't perfect since I was still wrapping the twine around the ribs, but it was certainly an improvement. Check out the difference between the first and last pictures of this post and you can see the different shapes of the chops.


Once the meat was tied up I seasoned it with salt and pepper and let it sit at room temperature for about an hour. After that, it was time to cook.

The first step was to sear the roast. I used my fancy dutch oven for this, and it worked absolutely perfectly. I added just a bit of canola oil to the heated dutch oven, followed by a tablespoon of butter, and then seared the pork on all sides for a total of about 5 minutes. I threw in a little bit of thyme and some whole garlic cloves and let them cook in the oil for a few minutes.


I turned the roast meet side up and covered it with some of the thyme and garlic. Into the oven it went for 15 minutes, after which I added a bit more butter to the pan, basted the meat, and returned it to the oven. The recipe said it would be done after just fifteen more minutes, but I found that it took close to an additional 30 minutes after that (an hour total). I took out the roast and let it sit for about fifteen minutes to allow the juices to distribute themselves and for a bit of carryover cooking.

It looks pretty good, right? After the fifteen minutes were up, I quickly snapped off the twine and sliced the meat between the ribs into some pretty large chops.


That looks really good. And it was. In fact, it was better than really good. It was probably the best pork I've ever had, save maybe some BBQ, but that's a totally different animal. Not literally, figuratively. It was incredibly juicy, tasted of the herbs and garlic, and perfectly cooked. The inside was ideal and the sear on the outside was great as well. When we ate it for lunch the next day I was expecting your typical dry, reheated pork. Somehow though it was still juicier than almost any pork I'd had previously. All of this for probably only 20 minutes of active cooking time and maybe 90 minutes total. It would have easily served six or eight people, so it could be a great dinner entree.

Sunday, July 6, 2008

Brine

I haven't been making a whole lot of dinners in the past month or more, so I decided it was time to tackle another, in Keller's words, plat de resistance. My choice was roast rack of pork for a few reasons, which I'll let you in on when I actually write about that. For now you get a quick brining write up...

The very first step in making the pork is to brine it for 24 hours. Everyone raves about the effects of brining your meat, but I had never done it before. A learning opportunity was imminent, albeit quite a simple one. There is one recipe in the book for brining both the pork and a chicken recipe, the only difference being the addition of some lemon to the chicken brine.

The ingredients for the brine are honey, salt, peppercorns, bay leaves, thyme, parsley, rosemary, and garlic. I didn't have any rosemary, so that got left out. It seems like a lot of all of the ingredients, but since brining is essentially the magical infusion of solids into a piece of meat (also a solid last I checked), you need a lot.

I heated the brine, which now included a gallon of water, until it boiled and kept it there for just a minute. I removed it from the heat and let it sit for a long, long, time. You can only use the brine when it's around room temperature or you'll end up with some prematurely cooked meat, and that's never a good thing. For the record, a gallon of boiling water in a cast iron pan takes about three hours to cool to room temperature. Save yourself some time if you plan on using the brine the same night you make it.


After the brine was sufficiently cool, I just submerged the pork, and into the fridge it went for 24 hours. When I was ready to cook the pork I took it out of the brine, rinsed it off, and patted it dry. Ta da, all done.

Let me tell you, brining makes a huge difference. Not to let the cat out of the roast rack of pork bag, but this was easily the juiciest pork I've ever had. Ever reheat a leftover pork chop in the microwave as a quick lunch at work? They suck, right? Not anymore, not if you brine it ahead of time. Seriously, for anything like that I ever make again, brining will take place. This is probably the single biggest technique I've picked up so far.

Wednesday, July 2, 2008

Lemon Tart

I was riding the success of the pine nut crust, so the filling for the lemon tart just had to be a success. Although it's not my favorite dessert, mostly because it lacks the sweetness to be considered among the best of the best, lemon tart is a good, light, summery kind of dessert.

The ingredients for the filling, a sabayon, are simple. There's lemon, sugar, butter, and egg. That's it.

I started by heating up a pot filled with just a bit of water to use as the base of a double boiler. After looking around for a big metal bowl to serve as the top half of the boiler, I settled on the bowl of our mixer. It's pretty large, but it's the only game in town as far as metal bowls in my kitchen are concerned. Here's the mismatched setup:

I whisked the eggs and sugar in the bowl for about a minute until it was nice and smooth. This is the base of the sabayon filling. I placed the mixture on the now boiling pot and whisked it constantly for another few minutes.

The rest of the preparation consists of adding some lemon juice and then whisking. And then some more lemon juice, then whisking. Action shot!

Then add some lemon juice. Then whisk. Then whisk. Then whisk. Then get an arm amputation. Slowly but surely, the mixture thickens, grows in volume, and lightens:


To get to this point required about 10 minutes of whisking. If you haven't done that before, it's kind of a long time. But we weren't done yet. I say "we", because this amount of whisking was a two person effort. I started to add small pieces of the butter one at a time, whisking in between until each had melted and was fully incorporated. Once that was done, I filled the tart shell. Action shot!


The filling didn't completely fill the shell, which was a tad disappointing, but by now I had figured out that both components were very tasty so I didn't care a whole lot.


While the filling was still warm, under the broiler it went. Action shot! Sorry, that's probably getting annoying by now.


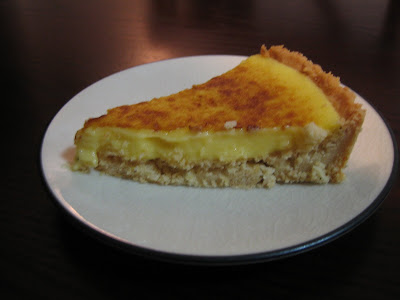
About three and a half seconds later, it was browned. Ok, so maybe not three and half seconds, but really fast. No more than 30 seconds. Here's the finished tart:


We tried it while it was still warm, and it was great. We tried it again after a night in the fridge, and it was really great. Nice and tart, but still creamy with an excellent crust. The tart became a staple in our house for breakfast, lunch, and dinner for nearly the entire week.


I'll be making this again this weekend for three reasons. First, I still have enough dough for two more shells in the freezer. Second, it's very good and very easy. And most importantly, it's helping me with my upper body strength.